Tell me if this sounds like a familiar scene at your house:
Yelling, “WHERE’S MY PHONE?” at least once per day.
Spending five minutes of your life you’ll never get back untangling power cords.
Searching every dusty corner and under couch cushions for the right charger for your phone. Damn you, manufacturers.
Vowing to find a solution so you never have this problem again.
Annnd repeating the whole mess again day after day after day.
Every person in the known universe–who uses some form of electronic device–runs into one or more of these situations every day. We thought having all these devices around would make life easier, but they’ve simply added to the clutter and confusion of trying to keep our life together. In the interest of simplifying our lives and staying organized, I came up with a fun weekend project and made a vintage charging station for electronics, which now sits in a central location for everyone to have access.
After looking online for inspiration and finding a lot of boring designs for charging stations–true story–I headed to an antique market to find something unique and beautiful, which could sit on my kitchen counter and not be a complete eyesore. The power cords are ugly enough on their own!
When we have people at the house, everyone asks if they can charge their iThings and we end up with cords like spaghetti in all our outlets. So, this isn’t just for our family benefit, but for my sanity when we have friends over, too.
Keep reading for easy steps to solve all your cord problems, too…
So back to the antique market, have you been to one lately? You find all kinds of weird and wonderful things there. I found a cool box that opens so I can hide an extension cord inside. The plan is for the extension cord to connect to the main outlet and allow us to plug all other charging cables directly to the extension.
Step 1


Step 2
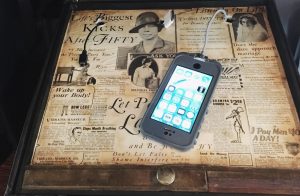
I also bought a magazine from 1928 with old articles to cover the top and give the box some character.

Step 3
After flipping through the magazine, I chose my favourite articles and ads and clipped them out.

Step 4
I coated the top of the box with Modge Podge and placed the articles where I wanted them. Once the articles were in place, I topped them with 2 more layers of Modge Podge to protect the pictures.


Step 5
Once the Modge Podge dried, I gave the articles a more antique look by using distressed ink and a small sponge.

Step 6
Follow the distressing with one more layer of Modge Podge to add a final coat of protection.


Step 7 a & b
Now this is key: Find a power cord that isn’t already being used to power half your appliances (pro tip), and choose one with the length of cord required that fits inside the box. Once I had what I needed, I drilled a hole in the back of the box/charging station for the plug.
Decide how many devices you want to be able to charge at any given time, and measure and drill the holes accordingly. I then drilled holes in the top of the box to fit the USB end of the charging cord.

Ta-Da! You’re Done
Plug in all the charging cords into the power bar inside the box and then plug all your charging cords into the power bar. Pull the charging cords through to the top of the box; now it’s ready to plug in anything that needs charging.

The charging station not only keeps my kitchen looking tidy, it also comes in handy to store scrap bits of paper and pens for scribbling notes when needed or inspiration strikes.
 The Mont Tremblant Snowshoe and Fondue Tour Is Winter Fun for Active Families